This knitted project is taking me longer than I thought it would. But then again, I have been doing other things as well.
Anyhow here's the next instalment.
My intention was to knit and make up exactly as the knitting pattern, but I have had to make some adjustments, owing to the fact that the sizing of some pieces were incorrect.
Here's a picture of the main body pieces once I'd sewn them together...
....still looks like a Frankenstein creation to me, but I'm sticking with the pattern. All the pieces were knitted and sewn up as instructed. This is the back view.....
......looks even more like a monster!!!
Then it was on to the kimono......
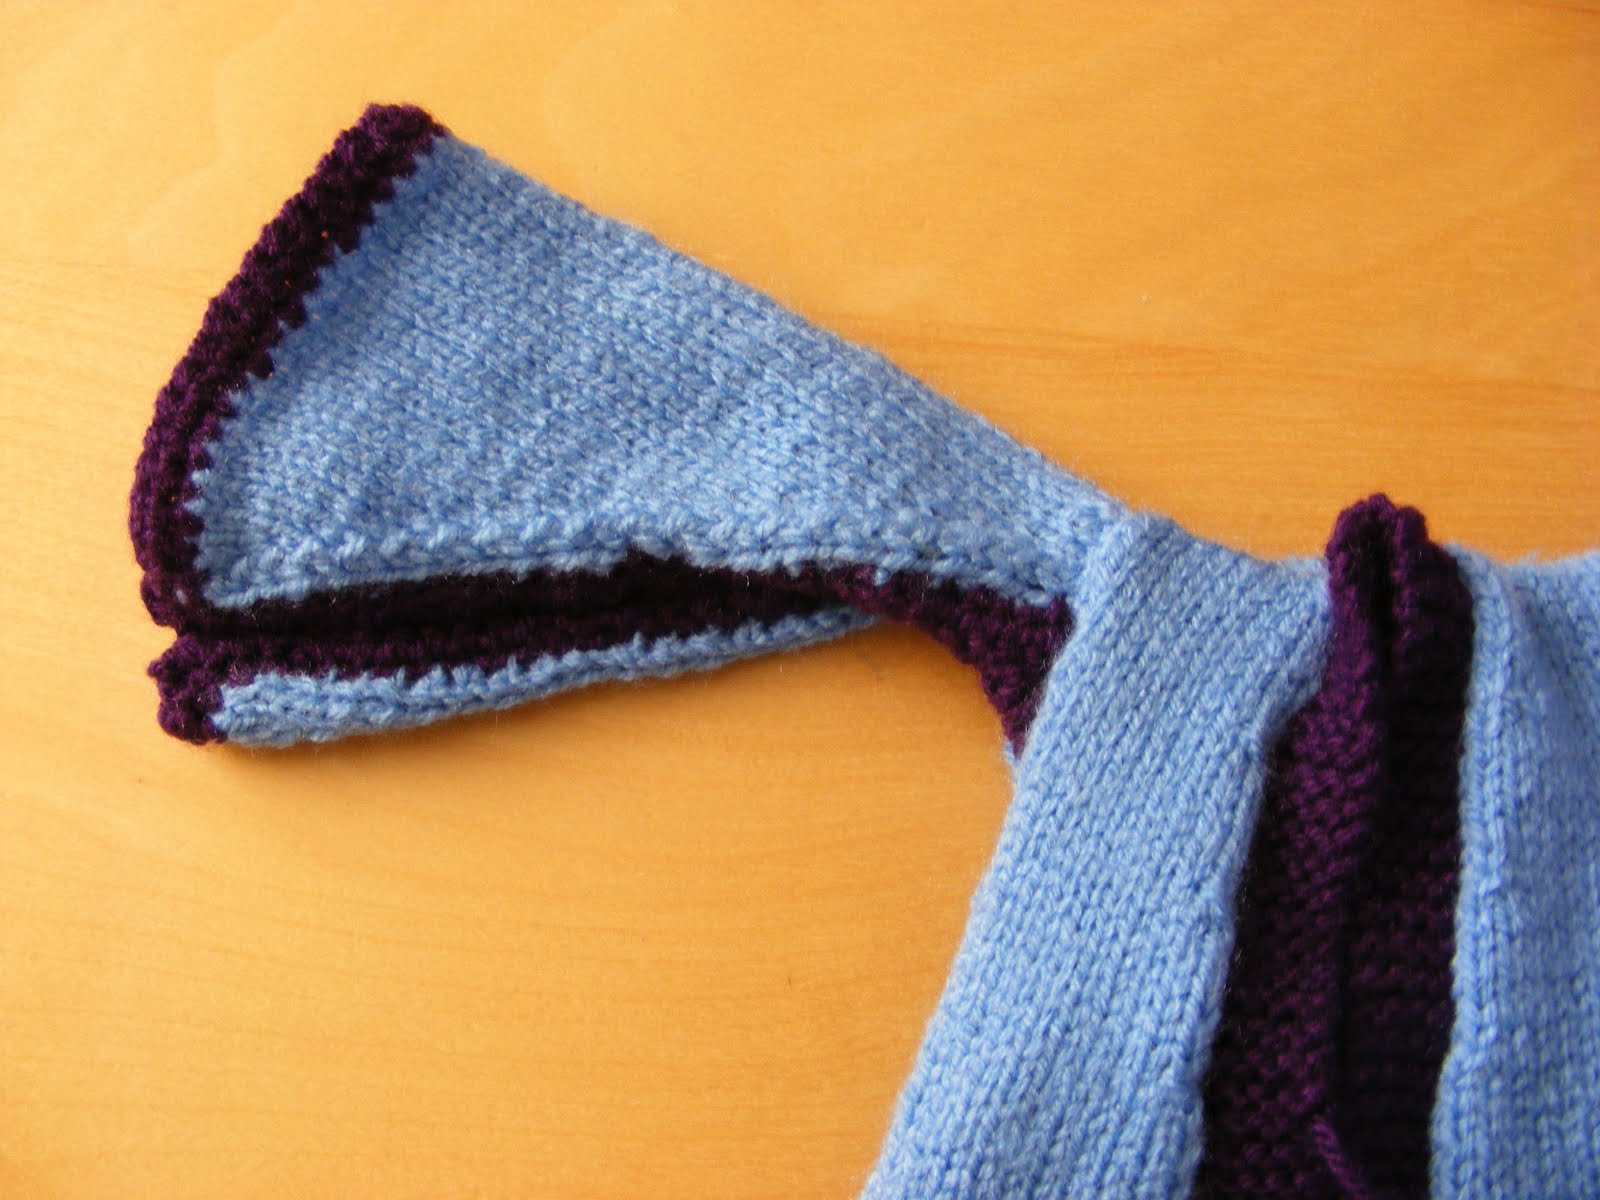
....it was here where I made the first adjustment. After measuring and pinning all the pieces together, if I'd sewn the kimono up according to the pattern, it would in no way have fitted the doll. The tops of the sleeves were too narrow. The choices were, to undo and re knit the pieces bigger or to extend the edging detail! Well I opted for the second choice. The pattern says to work 2 rows of double crochet along lower edges of sleeves, back, front and side slits. Well, to make the sleeves wider I double crocheted around the inside seams of the kimono sleeves and sides.....
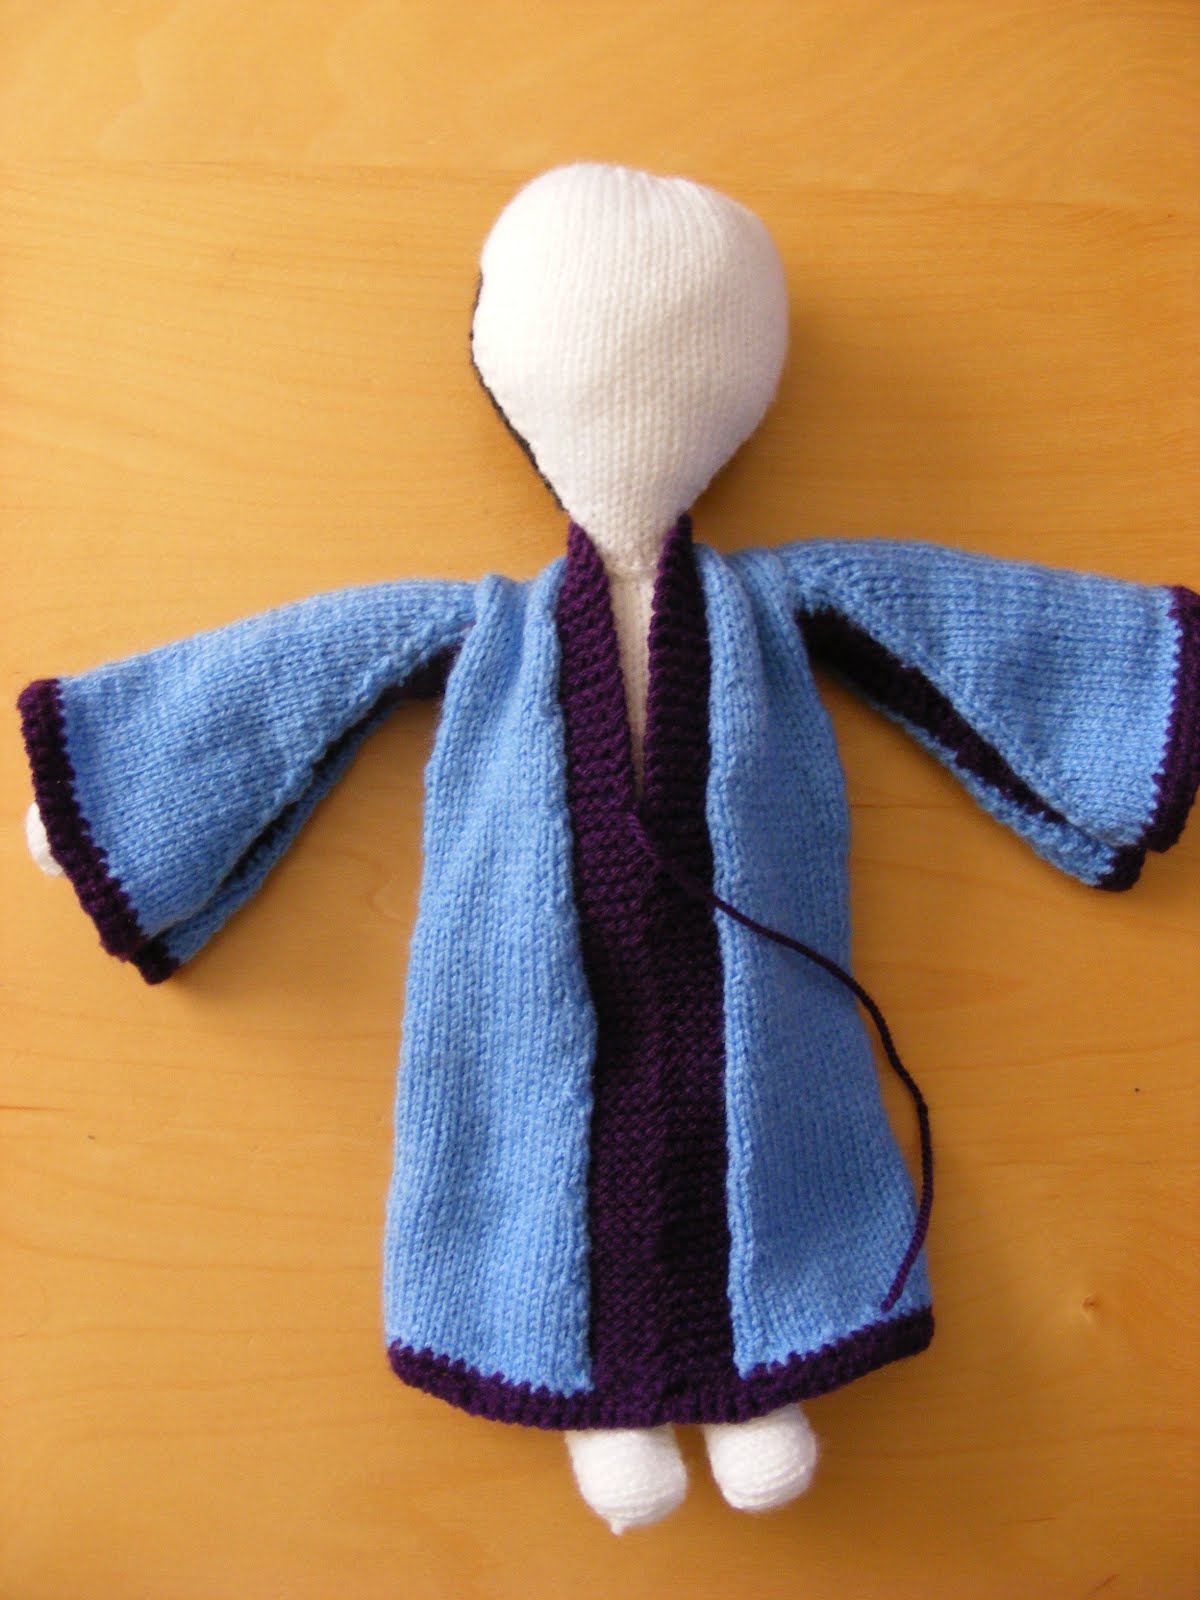
....once I'd sewn it all together I "dressed" my little Geisha....
......that was much better. It actually looked and fit better....
..I still think that the pattern is wrong and don't like the neck and shoulders, but it was made as the pattern was written.
She still doesn't have hair or features as you can see. They will be done last.
Here are the pieces for the shoes......
...still to be sewn together and fitted on to the feet. I am hoping to get it completed within the next couple of days. One thing's for sure, after having this pattern since the early 70's and only just knitting it, I can see now why I've never seem many of these knitted up!
I'm already making my own draft of this pattern, with less pieces, more shape and a few other adaptations. That's for a later date, along with some other things I have in my notebook......
One of our grand daughters had a 4th Birthday recently. She loves anything to do with cupcakes, eating them, drawing them and helping her mum make them.
So the theme for her birthday card was just that....
....I used these lovely Kanban clear stamps. Great stamps, very clear images. I also used Promarkers and Art Institute fine glitters.
It seems to be the norm that the craft experts tell us to use bright white card when using Promarkers.....
...well I didn't. I used a lovely smooth off white card. I purchased it when the Papermill Shops were on the high street.
It was a box of the "Managers Special" card, a box for £2.99. It's one of the best buys I have ever bought. It even goes through the printer and the results are great.
The colours of the Promarkers looked lovely on this card.....
...they blended lovely, and the shades looked so pretty.....
....and once the glitter was added.......
.....and the "cherry" toppings were added to the background....
...they looked good enough to eat.....
.... as our grandson said!!
I have other cards to make over the next few days. We have quite a few birthdays in the family in May, June and July. Some of the card will be stamped and coloured, and some will be digital imagery. That is something which seems to spark a debate too, just lately, digital crafting! I shall be posting on that shortly.
Some other things I've lined up for myself over the next few days include some sewing. I have a small pile of things waiting by my sewing machine, some dyeing of fabric and now my little dropper bottles have arrived I shall be making alcohol inks. But I still have to gather some other small receptacles together before I begin with that.
Now the sun is shining at last and we still have planting and other jobs to do in the garden. There's nothing better than being busy and creative!


 ...the background paper I printed off from my Craft Artist cd rom. I changed the colour to this gorgeous pink, ( it's actually brighter than in the picture) then I used my Sizzix crown die and cut one in baby pink and one in 300gsm white card.
I glued the two die cut crowns together and once dry I went through my box of "sparkle"s and decorated it with flat back pearls and clear gems, some gems on a strip of silver thread (which I've had for ages and still have more left) and also used some Art Institute fine glitters, in various shades of gold, pink and white, to add more sparkle.
That was then mounted onto the card with 3d foam.
The picture was a recent one and that too was mounted on white card stock and edged with baby pink glitter.....
...the background paper I printed off from my Craft Artist cd rom. I changed the colour to this gorgeous pink, ( it's actually brighter than in the picture) then I used my Sizzix crown die and cut one in baby pink and one in 300gsm white card.
I glued the two die cut crowns together and once dry I went through my box of "sparkle"s and decorated it with flat back pearls and clear gems, some gems on a strip of silver thread (which I've had for ages and still have more left) and also used some Art Institute fine glitters, in various shades of gold, pink and white, to add more sparkle.
That was then mounted onto the card with 3d foam.
The picture was a recent one and that too was mounted on white card stock and edged with baby pink glitter.....
 .....the wording I did on the computer, cut out and mounted and finished as I did the the picture. I finished off with some clear glitter glue around the edges and added some to the background on the fairy coaches and horses.
I did an insert to match but omitted to photograph it!
.....The second card was for our sons' birthday. Every year I do a different theme for him. This year I chose Batman. He's a great artist (and still draws and paints when he gets time) and he and our grandson share the love of Batman computer games!
This card is also C5, in black 300gsm.
The background image and the main image were from a book. I cut out the pieces I wanted (It's a damaged book) and mounted them onto the black card. The image of Batman was mounted on black 3d foam (I made it from black funky foam and double sided tape, much cheaper doing it this way).....
.....the wording I did on the computer, cut out and mounted and finished as I did the the picture. I finished off with some clear glitter glue around the edges and added some to the background on the fairy coaches and horses.
I did an insert to match but omitted to photograph it!
.....The second card was for our sons' birthday. Every year I do a different theme for him. This year I chose Batman. He's a great artist (and still draws and paints when he gets time) and he and our grandson share the love of Batman computer games!
This card is also C5, in black 300gsm.
The background image and the main image were from a book. I cut out the pieces I wanted (It's a damaged book) and mounted them onto the black card. The image of Batman was mounted on black 3d foam (I made it from black funky foam and double sided tape, much cheaper doing it this way).....
 ..The wording I again did on my computer. I used a shadow effect on the words as I wanted it to look grungy and Gothic. I then clear embossed it and then crackled it (in the fridge).....
 .... for the insert ( again, didn't photograph it. Too busy thinking of my holidays!) I scanned in the picture of Batman and printed it out landscape to fit the card. Using my decorative scissors I cut all around the edge of the insert. It turned out great because the edge resembled the shape of bats!
To finish off I scanned in one image of the bat logo and filled a sheet with them.
I cut them out......
.... for the insert ( again, didn't photograph it. Too busy thinking of my holidays!) I scanned in the picture of Batman and printed it out landscape to fit the card. Using my decorative scissors I cut all around the edge of the insert. It turned out great because the edge resembled the shape of bats!
To finish off I scanned in one image of the bat logo and filled a sheet with them.
I cut them out......
 ....and folded the wings slightly and these were then placed loose inside the card. When the card was opened the bats were "released", it worked perfectly.
Both cards turned out exactly as I wanted them too, and both our grand daughter and son were thrilled with them.
I finished these cards before we went on holiday as both birthdays were whilst we were away.
I've now got three more cards to make before the middle of July. I think I know which themes I shall be doing.
We've just had two wonderful weeks away in Cornwall. We've both returned home refreshed and revitalised. I have loads of ideas and jottings in my notebook, and I just have to sit down and get them in some sort of order. We went to so many places and took so many photographs, it was wonderful!
I have a couple of ufo's to finish but then I can begin on my new projects.
Tomorrow I will be spending some time in the garden, everything is growing lovely now. There's also housework to do (isn't there always!) but I shall go through that like a blur so I can crack on with more exciting things!!
....and folded the wings slightly and these were then placed loose inside the card. When the card was opened the bats were "released", it worked perfectly.
Both cards turned out exactly as I wanted them too, and both our grand daughter and son were thrilled with them.
I finished these cards before we went on holiday as both birthdays were whilst we were away.
I've now got three more cards to make before the middle of July. I think I know which themes I shall be doing.
We've just had two wonderful weeks away in Cornwall. We've both returned home refreshed and revitalised. I have loads of ideas and jottings in my notebook, and I just have to sit down and get them in some sort of order. We went to so many places and took so many photographs, it was wonderful!
I have a couple of ufo's to finish but then I can begin on my new projects.
Tomorrow I will be spending some time in the garden, everything is growing lovely now. There's also housework to do (isn't there always!) but I shall go through that like a blur so I can crack on with more exciting things!!
 ......the clarity of the picture isn't great, (that's down to me not the camera) the light wasn't great, and I'm trying to catch up with things before we head off on holiday at the weekend!
So, I was going to knit her as per the pattern. As you can see ( if you have the pattern yourself) I did make some changes.
I didn't like the embroidered flowers on the original pattern, so I went for a rosebud effect...
......the clarity of the picture isn't great, (that's down to me not the camera) the light wasn't great, and I'm trying to catch up with things before we head off on holiday at the weekend!
So, I was going to knit her as per the pattern. As you can see ( if you have the pattern yourself) I did make some changes.
I didn't like the embroidered flowers on the original pattern, so I went for a rosebud effect... .... the obi I kept plain......
 ....although I may add a couple of rosebuds at the back.
On the original pattern the footwear had two horizontal straps.....
....although I may add a couple of rosebuds at the back.
On the original pattern the footwear had two horizontal straps..... .....I wasn't keen on that idea, so I attempted to recreate the original style.
It was on her head that I made quite a few changes......
.....I wasn't keen on that idea, so I attempted to recreate the original style.
It was on her head that I made quite a few changes...... ..... that turned out quite different to the original. I think it's because when I wound the strands, I wound it tighter than I should have, so maybe I should have used more yarn. I gave her a nose, purely and simply because I think it needed to be there. Here red lips are a small v and not a straight line as in the pattern and her eyes are smaller than the original too.
I need to sit and sort through my bead collection to find suitable pieces for her hair, (maybe this evening) to finish to look.
My overall verdict of this pattern is that there are too many pieces. I have already made some notes in my design book and I shall make another doll from scratch with my own pattern with less pieces and more shape. I'm happy with how it turned out, but not 100% and next time I shan't use double knitting yarn I shall use 4 ply.
I have quite a few images of Geisha, these are from a collection of stamps, matchbox labels and postcards which belonged to my late father. So I shall study these, make a few notes and try some shapes. It's also got me thinking of another project witch I could use these images on, my brain never stops!!
I did manage to get all the family birthday cards completed, I shall post these later. This afternoon I have baking to do. One Victoria sponge, one chocolate sponge and one apple cake. These are for Mick to take to work this evening as it's his birthday.
So that's my afternoon sorted. Now, when's that rain going to stop!!
..... that turned out quite different to the original. I think it's because when I wound the strands, I wound it tighter than I should have, so maybe I should have used more yarn. I gave her a nose, purely and simply because I think it needed to be there. Here red lips are a small v and not a straight line as in the pattern and her eyes are smaller than the original too.
I need to sit and sort through my bead collection to find suitable pieces for her hair, (maybe this evening) to finish to look.
My overall verdict of this pattern is that there are too many pieces. I have already made some notes in my design book and I shall make another doll from scratch with my own pattern with less pieces and more shape. I'm happy with how it turned out, but not 100% and next time I shan't use double knitting yarn I shall use 4 ply.
I have quite a few images of Geisha, these are from a collection of stamps, matchbox labels and postcards which belonged to my late father. So I shall study these, make a few notes and try some shapes. It's also got me thinking of another project witch I could use these images on, my brain never stops!!
I did manage to get all the family birthday cards completed, I shall post these later. This afternoon I have baking to do. One Victoria sponge, one chocolate sponge and one apple cake. These are for Mick to take to work this evening as it's his birthday.
So that's my afternoon sorted. Now, when's that rain going to stop!!