Incredible inedibles, and other unique creations all from my own designs and patterns.
Wednesday, 23 May 2012
Body Parts....Phase 2
This knitted project is taking me longer than I thought it would. But then again, I have been doing other things as well.
Anyhow here's the next instalment.
My intention was to knit and make up exactly as the knitting pattern, but I have had to make some adjustments, owing to the fact that the sizing of some pieces were incorrect.
Here's a picture of the main body pieces once I'd sewn them together...
....still looks like a Frankenstein creation to me, but I'm sticking with the pattern. All the pieces were knitted and sewn up as instructed. This is the back view.....
......looks even more like a monster!!!
Then it was on to the kimono......
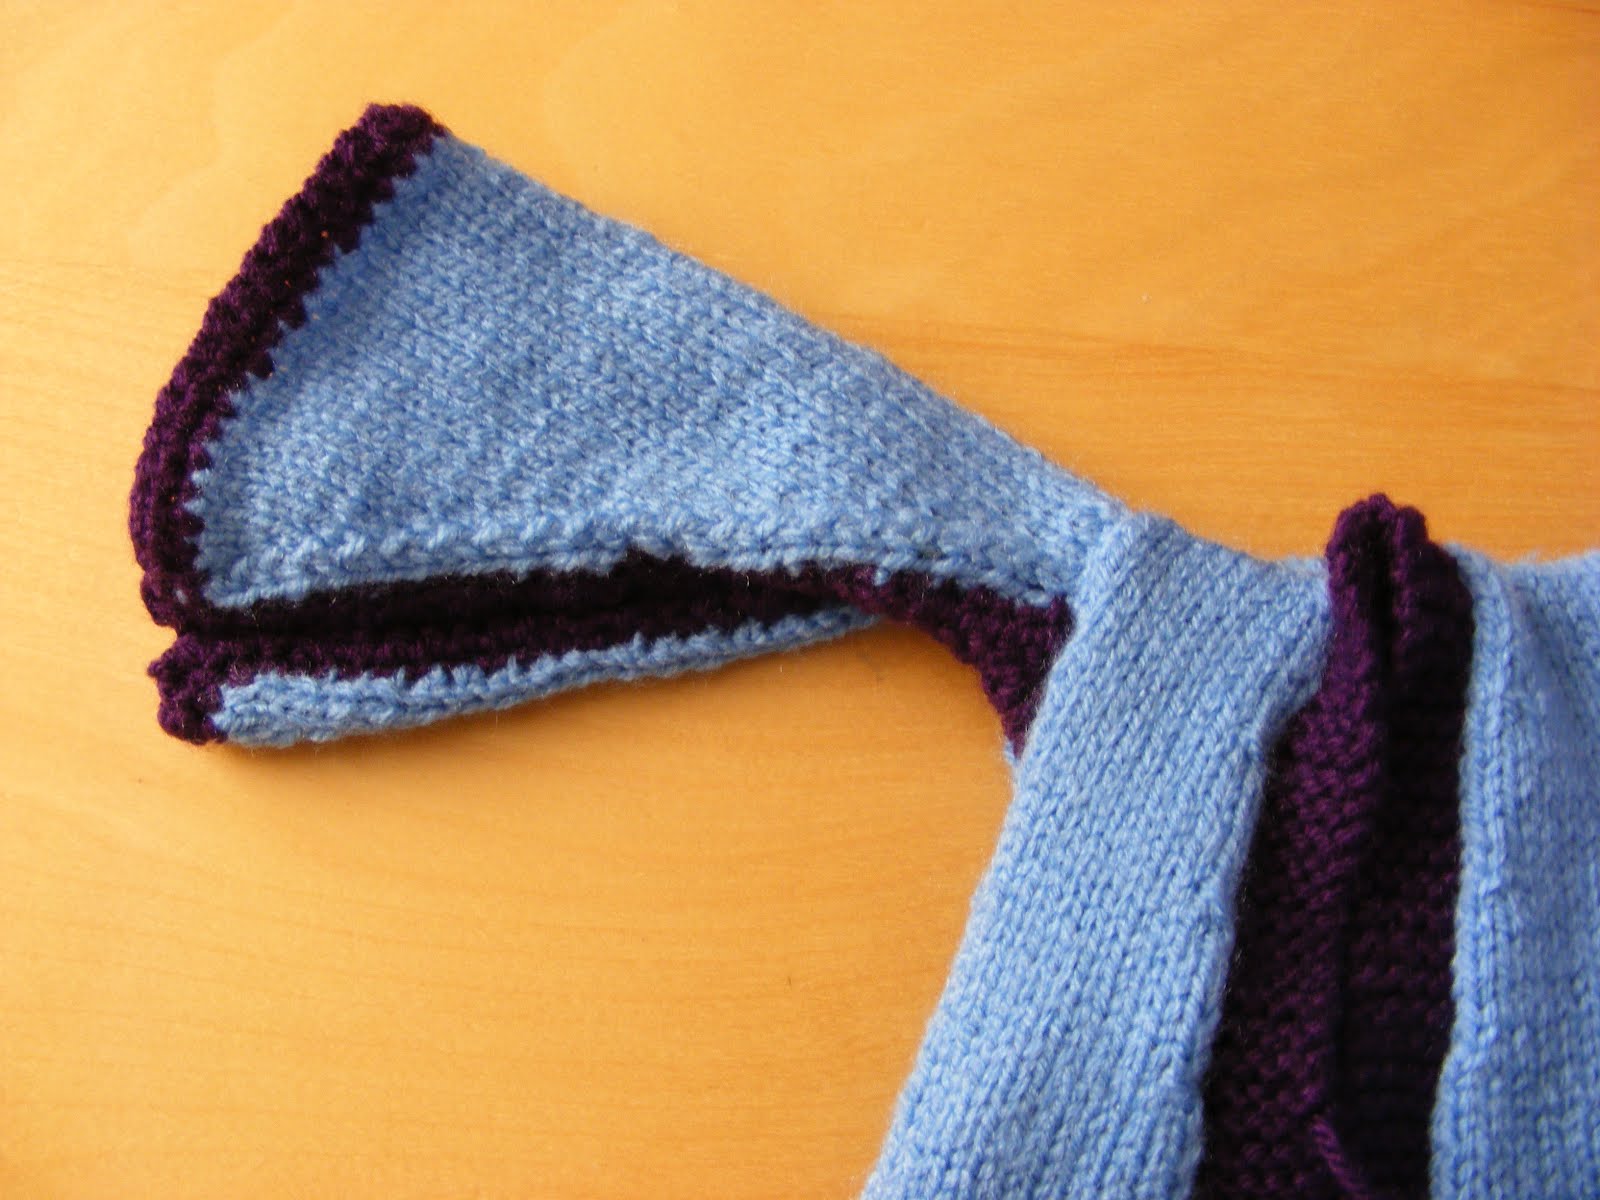
....it was here where I made the first adjustment. After measuring and pinning all the pieces together, if I'd sewn the kimono up according to the pattern, it would in no way have fitted the doll. The tops of the sleeves were too narrow. The choices were, to undo and re knit the pieces bigger or to extend the edging detail! Well I opted for the second choice. The pattern says to work 2 rows of double crochet along lower edges of sleeves, back, front and side slits. Well, to make the sleeves wider I double crocheted around the inside seams of the kimono sleeves and sides.....
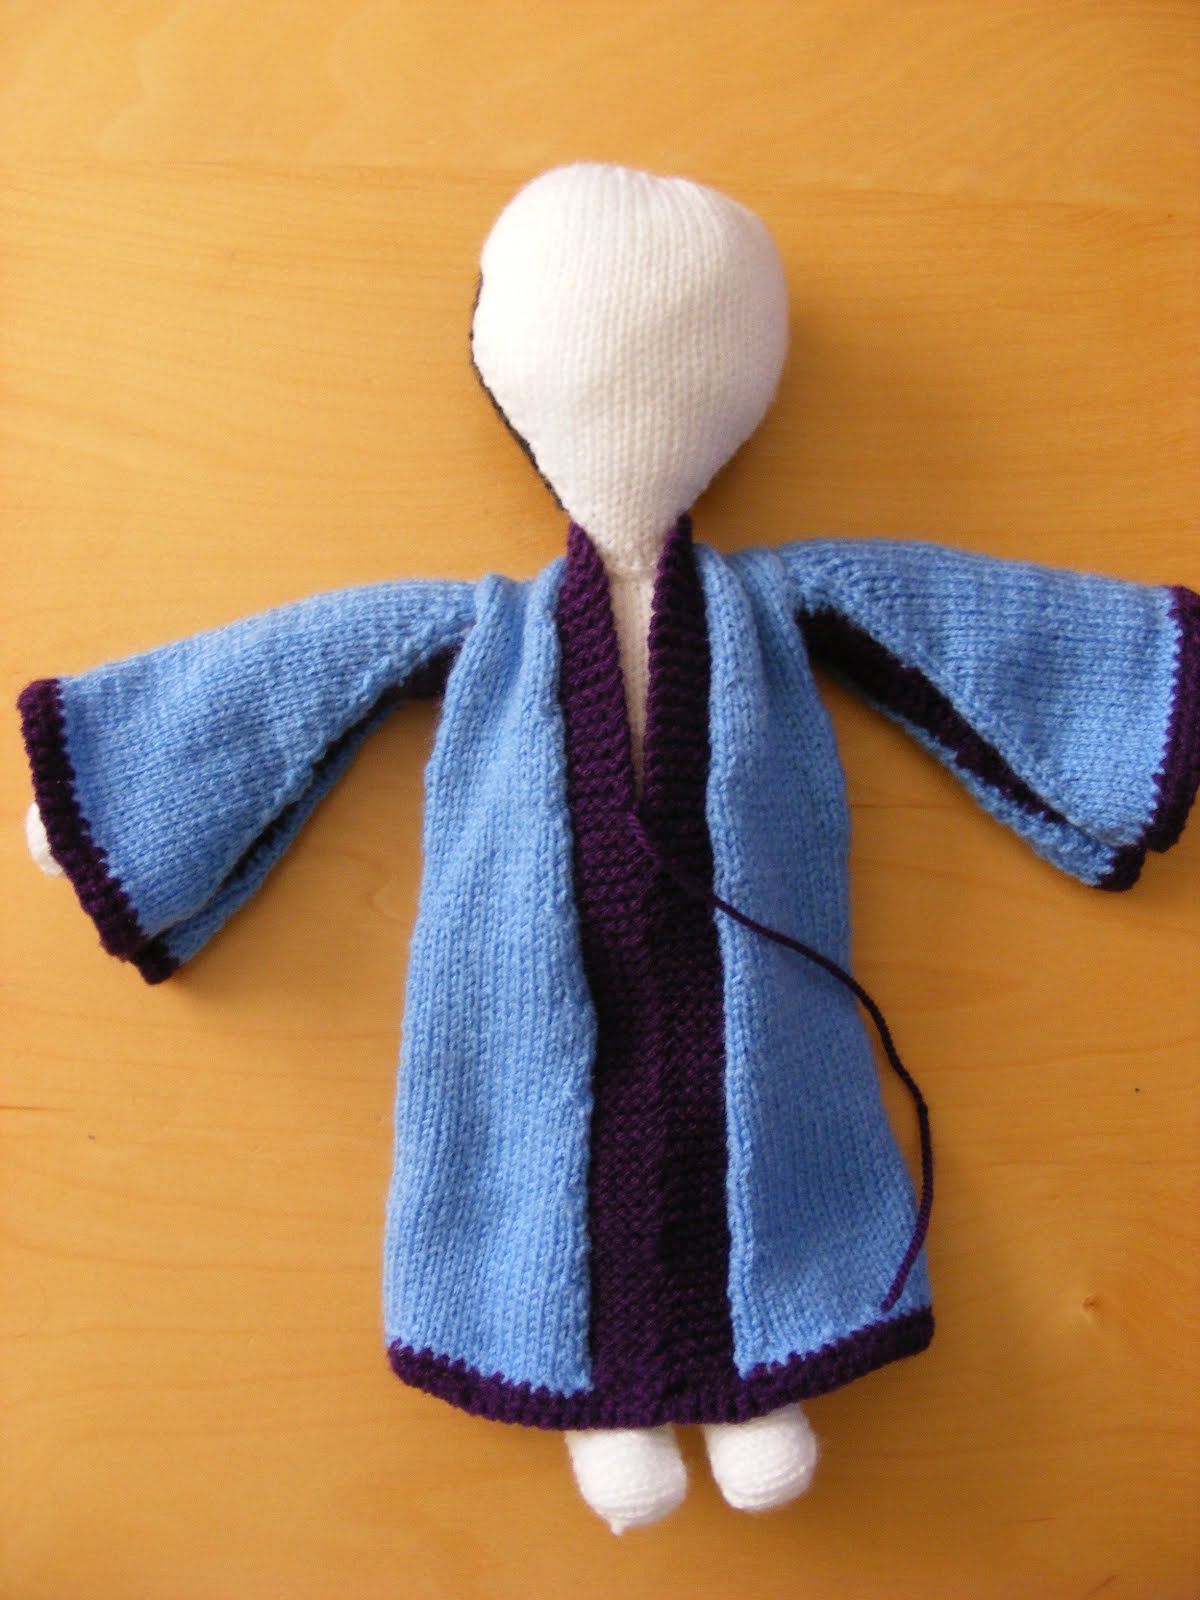
....once I'd sewn it all together I "dressed" my little Geisha....
......that was much better. It actually looked and fit better....
..I still think that the pattern is wrong and don't like the neck and shoulders, but it was made as the pattern was written.
She still doesn't have hair or features as you can see. They will be done last.
Here are the pieces for the shoes......
...still to be sewn together and fitted on to the feet. I am hoping to get it completed within the next couple of days. One thing's for sure, after having this pattern since the early 70's and only just knitting it, I can see now why I've never seem many of these knitted up!
I'm already making my own draft of this pattern, with less pieces, more shape and a few other adaptations. That's for a later date, along with some other things I have in my notebook......
One of our grand daughters had a 4th Birthday recently. She loves anything to do with cupcakes, eating them, drawing them and helping her mum make them.
So the theme for her birthday card was just that....
....I used these lovely Kanban clear stamps. Great stamps, very clear images. I also used Promarkers and Art Institute fine glitters.
It seems to be the norm that the craft experts tell us to use bright white card when using Promarkers.....
...well I didn't. I used a lovely smooth off white card. I purchased it when the Papermill Shops were on the high street.
It was a box of the "Managers Special" card, a box for £2.99. It's one of the best buys I have ever bought. It even goes through the printer and the results are great.
The colours of the Promarkers looked lovely on this card.....
...they blended lovely, and the shades looked so pretty.....
....and once the glitter was added.......
.....and the "cherry" toppings were added to the background....
...they looked good enough to eat.....
.... as our grandson said!!
I have other cards to make over the next few days. We have quite a few birthdays in the family in May, June and July. Some of the card will be stamped and coloured, and some will be digital imagery. That is something which seems to spark a debate too, just lately, digital crafting! I shall be posting on that shortly.
Some other things I've lined up for myself over the next few days include some sewing. I have a small pile of things waiting by my sewing machine, some dyeing of fabric and now my little dropper bottles have arrived I shall be making alcohol inks. But I still have to gather some other small receptacles together before I begin with that.
Now the sun is shining at last and we still have planting and other jobs to do in the garden. There's nothing better than being busy and creative!
Saturday, 21 April 2012
Body parts!
I'm working on another knitted project. It's actually a vintage pattern from the late 60s.
The problem with many of these old patterns is that there were mistakes in them. I remember in the early 70s buying a pattern for a jacket, and the pattern was completely different to the one in the picture. So I adapted the pattern and it turned out really nice. In fact I was wearing that navy jacket for years!!
Anyway, this one is for a knitted geisha doll....
...the picture does it no justice does it!
I've had this pattern for years and have always meant to knit it up to see if it turned out better that the picture. Well, here's my findings so far.
Firstly, there are too many pieces to knit. I know these patterns were made as quick makes for fairs and fete stalls etc, but I can see this putting people off if they haven't been knitting very long.....
.....the picture looks really odd I doesn't it!
As you can see, the head looks way too big, but I'm hoping that once the hair and features are in place it will be more in keeping with the body.
The dress is also made up of too many pieces....
.....the purple panel is only pinned to the main piece at them moment, and the pattern gives instructions to crochet edges on sleeves, side and hem.
Well, I shan't be doing that because I have something else in mind. But once this one is complete I shall remake this doll to my own pattern. There will be less pieces to begin with!
......
I've been sorting my collection of knitting patterns recently and I have far too many. I haven't even used some of them.
Here are a selection. If you would like any or all of them please email me, I'll be happy to put them in the post to you, at no cost. I'm not selling them they are free to anyone who wants them.
.......
......
........
.......
........
.......
.......
Please contact me if you are interested.
I have some birthday cards to make this week, so I'll be back to stamping and colouring. I'm also want to start on a project using some drinks cans , Sizzix dies and some home made alcohol inks. I have all my ingredients ready to make the inks, I'm just waiting on the arrival of the plastic dropper bottles. But I shan't be idle whilst I'm waiting for the postman to arrive, I may even be able to get out into the garden, once the showers have subsided!!
Thursday, 12 April 2012
No sew tee shirt bag
Well, my tee shirt bag is now finished and I shall be using it quite a lot this summer.
I made it using the methods which my mother taught me. So here goes.
Once your old tee shirts have been gathered together, cut them as you want to. There are many methods, and the one I use is the continuous vertical cuts.
First of all the needle size is up to you. For my bag I used needles which my dad made for my mum, and these measure 3/4" in diameter ( no metric then!)
...decide how big you want your bag to be. I just did mine by eye, no tape measure required.
I worked on 25 stitches and continued to knit one piece, checking by folding every so often, if it was going to be long enough once it was folded. My piece measured 28" and then I cast off.
....The next step was to determine where the straps were going. For this I counted in five stitches from one edge, then using 6mm needles I picked up and knit 5 stitches. Working on these five stitches continue to knit until you have made the strap as long as you want it. The ones on my bag are 24" long. I used two colours on my straps because I wanted the random effect and didn't have any more of those coloured tee shirts left!
Once you have the desired length of strap, on the same side you have been knitting, at the other end, count in five stitches, pick them up and knit them with the 5 which you have on your needle. Be careful not to twist your knitting because you don't want a twisted strap. Cast them off and that's one side done. Line up the bag and knit the straps for the other side in the same way.
Now to tackle the sides.
Once again I used 6mm needles. Turning the bag inside out I lined up the sides and folded in half. I pinned and then to knit the two sides together I placed my needle through stitches on both edges of the fold, knitting two stitches and then casting one off ( as you would normally do) all the way along, until you come to the last stitch. Knit this off, leave a longer thread and weave this into the knitting. Matching the opposite side pick up and knit the same way. You could crochet the two edges together it would be just as easy.
After much thought I decided that I wasn't going to make any flowers for this bag, and so I just decorated it with vintage buttons, ( of which I have thousands!). This is my finished bag...
.....I've already used it. The best thing about it is that it was made by me my way.
My dad used to say that in any sort of craft there are no rules just guidelines. That is so true. So, if you are about to embark on a project just do it, and do it your way!
Tuesday, 3 April 2012
Knitting and stitching
These last few glorious days have (hopefully) been a taste of things to come but it seems that now ( for Easter) we're back to the cooler and overcast ones. Never mind, we can't do anything about it, so I have put my outside projects on hold for a few days.
Over the last week I've been knitting these....
....and these......
...I've also been doing some jumbo knitting....
...this bag took no more than 90 minutes to knit, and it's a no sew bag. I just have to put the embellishments on. I shall post a picture of it, together with the instructions on how I made it shortly.
I've two birthday cards to make today. these have to be posted tomorrow, but I know what theme I'm using for them so that should be a breeze.
My sewing machine is up and ready for action,and the fabrics are all cut.
If the weather is going to be dull and chilly for a few days, I shouldn't have any outside distractions. Although I am eager to get out into the garden.
I'm not normally as organised as this, I do hope it lasts!!
Tuesday, 27 March 2012
Dyeing for a change.
On my last post I had been doing this.........I had found ( whilst sorting and moving things) a pile of damaged vintage linens. This piece is a large oval tablecloth. The lace is torn in a few places. I had initially put it aside for a project which I want to do later on in the year. I need quite a few different fabrics and was going to keep them in a box or bag until I had collected everything I needed.
This is quite a big tablecloth, it must have looked stunning on a large table when it was in use and dressed with gorgeous tableware!
Anyway, I decided that I wanted to crack on and get it coloured.
I used the tea dying method which we did as children. I saved the used teabags in a plastic container, and when I had enough, in a large bowl I emmersed them in boiling water. I gave them all a good squeeze ( rubber gloves on) I wasn't bothered if any of the teabags burst. Once mixed I immersend the pristine white tablecloth into the bowl and it stayed there for over twelve hours. I did agitate it a few times.
Then I rinsed it out and it had a gentle hand wash, and I hung it on the line to dry....Because it was a lovely warm sunny day it dried pretty quickly. On the picture it looks a lot lighter than it actually is......it really has turned out lovely.
Following on from this, on Saturday we went to our local farmshop for our fruit and vegetables. I bought some beetroot and cooked it as soon as I got home. When it was cooked I looked at all that gorgeous red liquid and had an idea. I had another damaged piece of vintage lace, beautifully bright and white, but very badly damaged.
It went straight into the beetroot water complete with the peelings......in the liquid it was a gorgeous deep pink. But this is only a stain/discolouring process, and when I wash it out it will fade to very pale.
It turned out like this..........again it looks very pale and cream on the picture but it is a very pale dusty pink. If I was going to use it in a piece which would need washing often then this method would not be suitable, but as it's going onto a decorative piece it doesn't matter.
I have more pieces of fabric and lace to colour, and I shall be trying quite a few other things to stain with, spices, plant leaves and maybe some inks.
Watch this space, there's more to come.
Thursday, 22 March 2012
A compendium of crafts.
I seem to have been on a roll this last couple of weeks. It must be down to the lovely weather we've been having.
I've been continuing with my grand reorganisation of my little room. My button and bead collection is more organised now......they aren't all sorted, but I have utilised my glass jars and they now hold various collections in colourways........when they are all on the shelf together it will look really neat and tidy, a rainbow of jars which I can get to when I need to ( at last!)!
Whilst I have been sorting and shifting I came across some bits of old oil pastels, really nice colours. So I put them aside for when I'd done for the day so that I could sit down and have a play.
Here's what I came up with.......I hadn't done any wax art for a couple of years, and I am pleased with how these turned out. All I used was the old pieces of oil pastel on some glossy photopaper which was given to me. The paper had been bought from one of the £1 shops, and for printing pictures on, it was awful apparently, ( no surprise there I suppose) but for wax art it was great!
I have some art frames and I may put these together in the frame.
I have also been going through my magazine collection. To be honest I haven't bought a magazine for a good few years, I feel they are far too expensive, have way too many advertisments and repeat the articles too frequently. So from the ones which I had saved and the ones which have been given me I sat and removed everything I wanted, the rest went into the paper recycling. Any that were complete were sent to the local charity shop and library......... I have saved some lovely images, some which will be going into a collage on a wooden tray..........and some are going to be made into tags and bookmarks.........I'm also trying to sort my collection of vintage linens and fabrics.
There are some pieces which are really old and have seen quite a bit of wear and have damage to them. But I'm on the rescue of these pieces and will be making something with them later on in the year. In the meantime, a couple of pieces have been given this treatment......they've had an overnight bath in tea, then rinsed out in salt water, then a gentle hand wash. Now they're on the line......they've turned out just right. ( Tea bags in compost bin of course!)
I've had a birthday this week, and I've had a Sizzix Big Shot as a gift and some Bigz dies. I'm having a whale of a time with them. Will I still be using my original Sizzix machine and Sidekick? You bet I will! But now I have the option of using the bigger dies it's going to make things even better.
On the agenda for the next couple of days is a knitting project to finish off, some background pages for scrapbooking, I will use my Craft Artist software to manipulate some of the pictures I've taken. The sewing machine is ready for action, I have some patchwork pieces to sew together, which were done a while ago and have been waiting for the " right" backing fabric, which I have now found.
This afternoon I shall be baking, I was going to do it earlier this week, but didn't get the chance.
The weather is still nice so I might just try to get a few seeds sown in trays too!
Who needs the tv when there are so many more exciting things to do!
Wednesday, 7 March 2012
From Grandmothers Attic
I have decide to set up a blog in which all my vintage items and collections that I have for sale will be posted. I said in my last post that my collection of buttons was about 12,000+! Well I've spent some time sorting through the first huge box.....so shortly you will be able to see all of the items which I shall be selling....You will find vintage linens to lace, buttons to stamps, postcards to fabrics.
The first collection of items should be posted shortly. Here's the link
Subscribe to:
Posts (Atom)